How To Install MySQL on CentOS 7
MySQL is an open-source database management system, It uses a relational database and SQL (Structured Query Language) to manage its data.
Download and verify MySQL
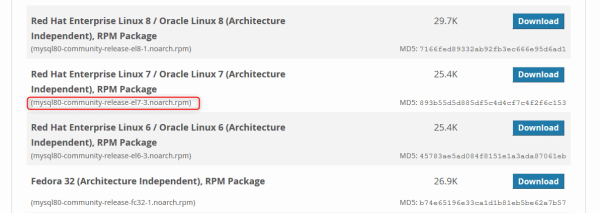
In order to download MySQL, open the following URL in your browser:https://dev.mysql.com/downloads/repo/yum/

Press Download bottom, and at the next page (If you don’t want to create an account) locate the text “No thanks, just start my download” then “Right-click” and choose copy the link location.
– Download MySQL
In your CentOS server, run the following command:
Note: you should edit the link in the following command with your new version.
wget https://dev.mysql.com/get/mysql80-community-release-el7-3.noarch.rpm– Verify the integrity of the downloaded file
Once the rpm file is saved, we will verify the integrity of the download by running md5sum and comparing it with the corresponding MD5 value listed on the site:
md5sum mysql80-community-release-el7-3.noarch.rpmOutput
893b55d5d885df5c4d4cf7c4f2f6c153 mysql80-community-release-el7-3.noarch.rpmCompare this output with the appropriate MD5 value on the site to verify that the file wasn’t corrupted or changed.

Install MySQL Server
First, we need to install the package:
rpm -ivh mysql80-community-release-el7-3.noarch.rpmThis adds two new MySQL yum repositories, and we can now use them to install MySQL server:
yum install mysql-serverPress y to confirm that you want to proceed.
– Starting MySQL Server
Start MySQL with the following command:
systemctl start mysqldWhen installing MySQL on CentOS 7, a temporary root password is generated, you can find it using the following command:
grep 'temporary password' /var/log/mysqld.logMake note of the password, which you will need in the next step to secure the installation.
– Change the temporary password
- use this command to run the security script:
mysql_secure_installation2. Enter the temporary password and press Enter.
3. Now, type in a new strong password.
4. Follow the on-screen instructions and hit y to finish the setup.
– Connect to MySQL
Use the following command to connect to MySQL as root:
mysql -u root -pEnter your MySQL root password and press Enter.
Connect to MySQL Remotly (Optional)
1. Create a user and grant it all privileges:
> CREATE USER 'root'@'%' IDENTIFIED BY 'your-password';
> GRANT ALL PRIVILEGES ON *.* TO 'root'@'%' WITH GRANT OPTION;
2. edit my.cnf file:
make sure that: bind-address=0.0.0.0
and if you have the line: skip-networking, make sure to comment it.
Restart MySQL service: systemctl restart mysqld.
3. Open the firewall port for MySQL:
MySQL by default use port 3306, you can use the following commands to open it
> firewall-cmd --add-port=3306/tcp --permanent
> firewall-cmd --reload
Now you can successfully connect to your MySQL server remotely.

